
TL;DR
Austin decks live under high UV, long hot spells, clay soils, and pop-up storms. A 60–90-minute seasonal walkthrough, as outlined in the deck safety checklist, prevents minor issues from becoming costly repairs. Work clockwise: start at the house connection (ledger & flashing), then move through footings/posts, beams/joists, decking, rails/stairs, and utilities. Look for wobble, soft wood, corrosion, loose fasteners, heaved footings, irregular stair geometry, and blocked ventilation. Clean, document with photos, and triage fixes by safety first. If anything in the attachment or rails/stairs feels questionable, pause use and call a pro. For a sense of local professional standards and craftsmanship, browse Ace Deck Builders.
Why Austin Decks Need a Seasonal Walkthrough
Central Texas punishes outdoor structures in ways you feel every August: intense sun dries finishes and opens hairline gaps; storm bursts drive water into those gaps; expansive clay swells and shrinks beneath footings; pollen and dust collect on every horizontal surface. None of this is fatal if you give your deck an honest once-a-season check. The goal of deck inspections isn’t perfection—it’s early detection and quick action where it counts: connection to the house, vertical supports, and people-contact areas (rails and stairs).
Pro tip: do your main safety check twice a year—one in early spring (post-storm season) and one in early fall (after peak heat). Spot checks are smart after hail or sustained rain, or if something suddenly feels “off.”
What You’ll Need (Tools, Time, and Safety)
Time: 60–90 minutes for an average single-level deck
Tools:
- Flashlight or headlamp
- Small pry bar/awl or screwdriver for probing soft wood
- 6–8 ft tape measure and torpedo level
- Socket/driver set for tightening accessible bolts/screws
- Camera/phone for a photo log (same angles every season)
- Garden hose for quick water-path testing and cleanup
- Work gloves, eye protection, and sturdy shoes
Safety: If anything feels unstable (significant wobble, rot at the ledger, rusted fasteners, or loose stair stringers), stop and skip that area until a pro inspects it. Do not climb under a deck with sagging members or obvious structural issues.
The 6-Zone Method: A Simple Circuit You Can Repeat
Walk clockwise around the deck each season using the same sequence. Consistency turns you into your own inspector, making small changes easy to spot in photos.
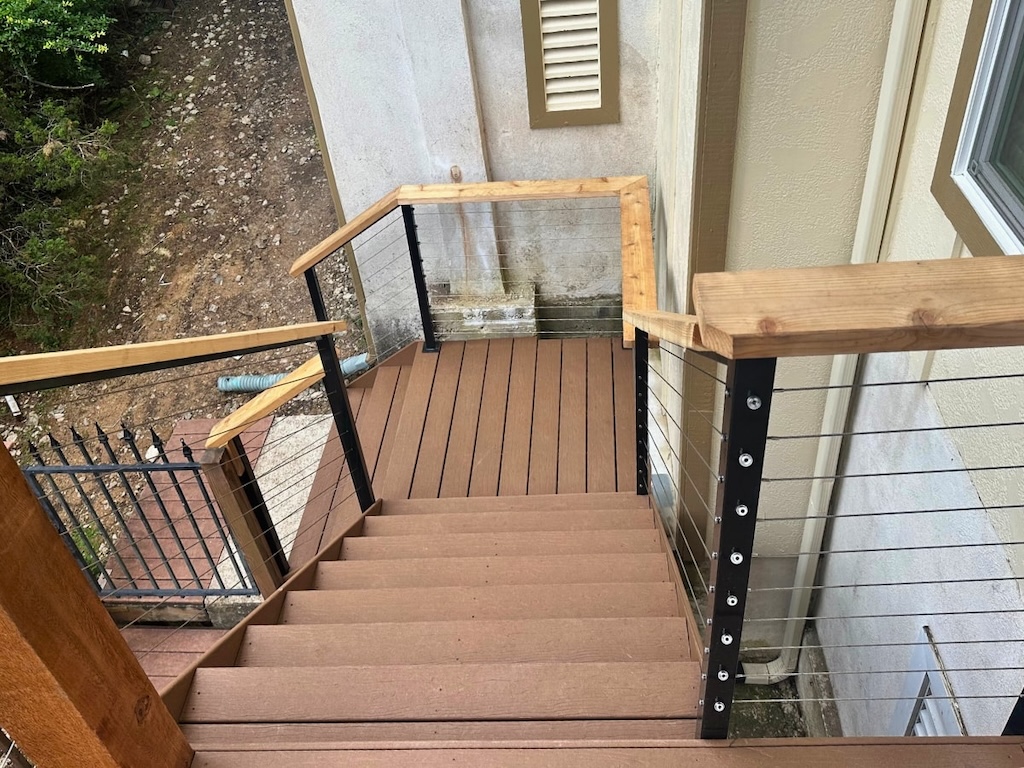
1) House Connection: Ledger, Flashing, and Doors
This is where most catastrophic failures begin, and where Austin’s wind-driven rain loves to test details.
- Wobble test: Stand where the deck meets the house. Push/pull the surface or guard. Any peel-away sensation is a red flag.
- Look for water tracks: Streaks below the ledger, swelling at door thresholds, or stains inside near the deck door signal moisture behind the cladding.
- Flashing path: You should be able to visually trace a continuous metal or approved membrane that tucks under the weather barrier above and laps over the ledger with a slight drip edge. No “face-seal only” caulk solutions.
- Hanger nails & fasteners: Joist hangers should be fully nailed with listed fasteners—not drywall screws. Ledger bolts or structural screws should appear in a consistent pattern, not random or sparse.
- Probe trim: Soft trim above/beside the ledger usually means water intrusion; document and plan a correction.
If you’re unsure whether what you’re seeing is safe, a focused deck inspection in Austin can document attachments, flashing, and fasteners with photos and a prioritized list you can act on—especially useful before buying or selling a home.
2) Footings & Posts: Soil Movement, Water, and Hardware
Austin’s expansive clays and surprise rock shelves make footing checks essential.
- Footing tops & grade: Post bases should be above grade, not buried. Soil shouldn’t be mounded against wood.
- Movement: Sight down posts. Any lean or twist since your last photos? Hairline shifts grow into rail wobbles and door-binding.
- Hardware condition: Post bases and anchors should be intact and corrosion-appropriate (HDG or stainless near pools/irrigation). Replace anything flaking or swollen with rust.
- Drainage: Downspouts should not pour toward footings. After a hose test, water should move away from the posts—not toward the pond.
- Critters & plants: Remove vines, leaf dams, and any storage blocking ventilation.
If a post base is rotten or a footing looks undermined, make a note to contact a pro to stabilize before the issue propagates into the framing and rails.
3) Beams & Joists: Spans, Rot, and Fastener Health
Structure hides under finishes, so use your flashlight.
- Beam seats: Posts should bear properly with listed connectors; no shims that crush over time.
- Checks & splits: Some surface checking is regular in lumber, but deep, wet splits at connectors require attention.
- Joist top edges: Look for darkened, spongy edges (water sitting beneath debris). Clear needles/leaves that hold moisture.
- Fasteners: Corroded screws/nails stain the wood around them; that halo often means it’s time to replace with exterior-rated fasteners.
Where water management or structural issues outrun DIY, a targeted professional inspection an deck repair in Austin scope can address fastener upgrades, sistering compromised members, and re-establishing proper post/beam connections without a complete rebuild.
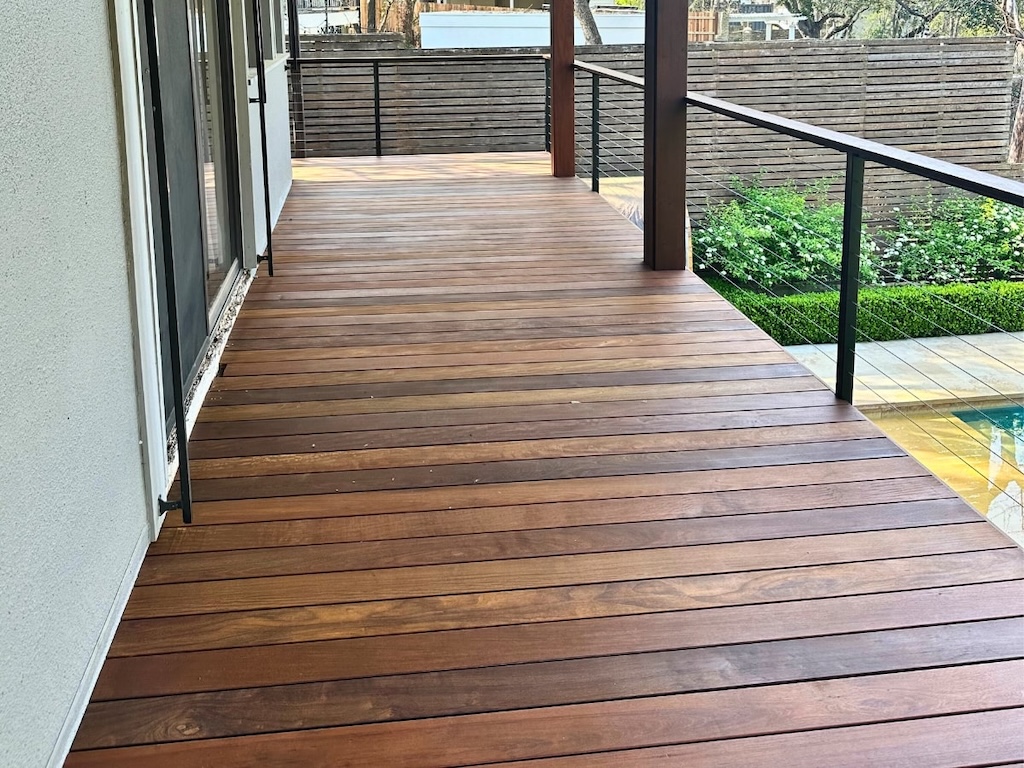
4) Decking Surface: Movement, Wear, and Water Paths
Comfort and safety meet here—especially in the late-day Austin sun.
- Trip hazards: Proud fastener heads, lifted board edges, and warped planks are common. Fasten or replace as needed.
- Gapping & expansion joints: Look for picture-frame borders and divider boards; ensure gaps are open so water and dust can escape.
- Surface temperature: Light-tone, matte/embossed surfaces run cooler; if the deck is too hot to use at 5 pm, plan for targeted shade over zones you actually occupy.
- Finish health (wood): If water doesn’t bead during a hose test, you’re due for a clean, then a stain/seal cycle. Don’t let UV get a full season head start.
5) Guards & Stairs: Clearances, Loads, and Geometry
This is where inspections most often fail—and where guests get hurt if something’s wrong.
- Guard wobble: Press hard at post height; the guard should flex slightly and spring back. If it “peels” at the rim/beam, you need proper blocking and hardware.
- Baluster/cable spacing: A 4-inch sphere shouldn’t pass through. Push on cable rails; deflection counts.
- Handrail graspability: Stair handrails must have a graspable profile, be continuous, and return cleanly—wide, flat caps don’t count.
- Rise/run consistency: Largest riser minus smallest ≤ about ⅜ inch across the flight; same for treads.
- Landings & lighting: Ensure safe, level landings and low-glare riser/side lighting for evening use.
If you want a deeper dive into common pitfalls before you meet a deck contractor or inspector, skimming a homeowner-friendly deck repair checklist for Austin helps you compare your notes with what pros prioritize in the field.
6) Lighting, Power & Extras: Safe, Tidy, and Weather-Tight
Minor electrical and accessory issues add up.
- GFCI & covers: Exterior outlets should be GFCI-protected with in-use covers that actually shut.
- Wiring: No exposed splices; low-voltage lines stapled neatly and protected from foot traffic.
- Fixtures: Replace cracked lenses and burnt bulbs; aim lights to avoid glare.
- Accessories: Grills need heat shields at walls; misters should not soak the structure; planters must not block ventilation.
Photo Log & Triage: How to Prioritize Fixes
Use your phone to take the same six to eight photos every season:
- House connection from two angles
- One shot under the deck at mid-span
- One post base close-up
- Beam-to-post connection
- A guard post connection
- Stair profile showing rise/run
- Any new stain/softwood area
- Utilities/lighting corner
Prioritize like an inspector:
- Life-safety first: wobbling guards, irregular stairs, loose handrails.
- Water next: flashing misses, soft wood, ponding at footings.
- Structure third: cracked beams/joists, corroded fasteners/connectors.
- Comfort & longevity: shade, finish cycles, hot rail caps, ventilation.
Document, label, and keep a small spreadsheet so your next season’s walkthrough is faster—and decisions are easier.
Cleaning & Minor Maintenance You Can DIY
A little rhythm goes a long way in Austin:
- Quarterly rinse + soap scrub (synthetic boards) or clean + stain/seal cadence (wood) every 12–24 months by exposure.
- Fastener tune-ups: Tighten proud screws and replace corroded hardware with exterior-rated equivalents.
- Vegetation control: Trim back shrubs and vines to keep skirting vents open.
- Furniture feet: Add soft feet to chairs/tables to prevent scuffs and fastener snags.
Pro tip: choose lighter rail caps and surfaces where hands/feet linger; they’re noticeably cooler at 5–7 pm.
When to Call a Pro (and What to Ask For)
Call a specialist when you find any of the following:

- Wobble at the house connection or visible flashing gaps
- Soft or collapsing stair treads/stringers
- Guard posts that move or peel under force
- Footings that appear undermined, tilted, or buried in soil
- Widespread corrosion on connectors/fasteners
Ask for:
- An itemized scope with photos of each issue
- Inspection hold points (what gets verified before it’s covered)
- Hardware/fastener specs (HDG vs. stainless, connector models)
- Moisture path explanation (how water leaves the scene)
- A staged plan if the budget requires phasing (safety items first)
FAQs
Book a Safety-First Estimate (CTA)
Want a pro to confirm your notes, tighten what’s loose, and design solutions for attachment, rails/stairs, footings, and water management—without overselling a rebuild? Start with a free deck estimate in Austin, and we’ll turn your seasonal walkthrough into an itemized, inspection-ready plan you can trust.