
TL;DR
A Central Texas deck lasts longer (and feels better to use) when you treat maintenance like a rhythm, not a rescue mission. The Austin-proof plan is simple: once per year, run a structured pass over safety hardware, drainage, end-grain, and finishes; then layer in quick monthly habits during the sunny season. Expect about 2–4 hours per month, March–October, and a single deep day in late winter. Priorities: tighten structural connections, keep water moving off and under the deck, seal/refresh exposed ends, and re-coat high-wear surfaces before they fail. Sprinkle in quick touches—like clearing debris from stair treads, rinsing pollen, and checking post bases after storms—and you’ll sidestep the big-ticket stuff (rot at the ledger, loose guards, cupped boards). If you’d like a sanity check on your structure or a prioritized punch list, our local team can walk your site and tailor this plan to your yard’s sun, slope, and species.
Why Austin decks need an annual tune-up
Austin’s weather is gorgeous for outdoor living—and rough on outdoor materials. Summer heat bakes oils and sealants; sudden storm bursts drive water into end-grain; cedar pollen and dust build slick films; fall leaves dam drains; and periodic wind events work on guards and stair connections. An annual tune-up turns those stressors into a manageable checklist instead of surprise repairs.
Early in your planning, it helps to calibrate what’s “normal” aging versus a structural red flag. If you’d like a quick walk-through to set baselines and priorities, our Austin deck team can review your specific exposure (west sun, shade pockets, pool splash zones) and translate this plan to your yard.
What “good condition” looks like (quick self-inspection)
Before you decide what to do, decide what you have. Grab a flashlight and a driver’s bit; then scan:
- Posts and bases: Dry, solid, and elevated off concrete with stand-off bases. No soft fibers at contact points.
- Beams and joists: Straight, no sagging, no dark, mushy ends at the ledger or rim.
- Ledger area: Clean, continuous flashing with a positive drip edge; no staining or soft sheathing underneath.
- Deck surface: Consistent gaps; no proud screws; hidden fastener rows tight; a finish that still beads light water in most places.
- Rails and guards: Posts don’t rock under a firm pull; the top rail doesn’t flex; fasteners aren’t rust-streaking the wood.
- Stairs: Solid stringer bearing, even risers, secure treads, graspable rail, good traction underfoot.
- Under-deck and perimeter: Clear airflow; no leaf dams; downspouts and French drains moving water away.
- Lighting and electrical: Low-voltage runs protected and dry; GFCI-protected outlets; no cracked lenses or exposed splices.
If you hit more than a couple of “fails” in those bullets, schedule a professional inspection mid-plan so you aren’t finishing over hidden issues.
The annual deep day (late winter): step-by-step
Late winter (typically February) is the sweet spot: cooler temps for working, fewer leaves, and enough dry windows to prep and cure materials. Budget a single, focused day (or a weekend for larger decks).
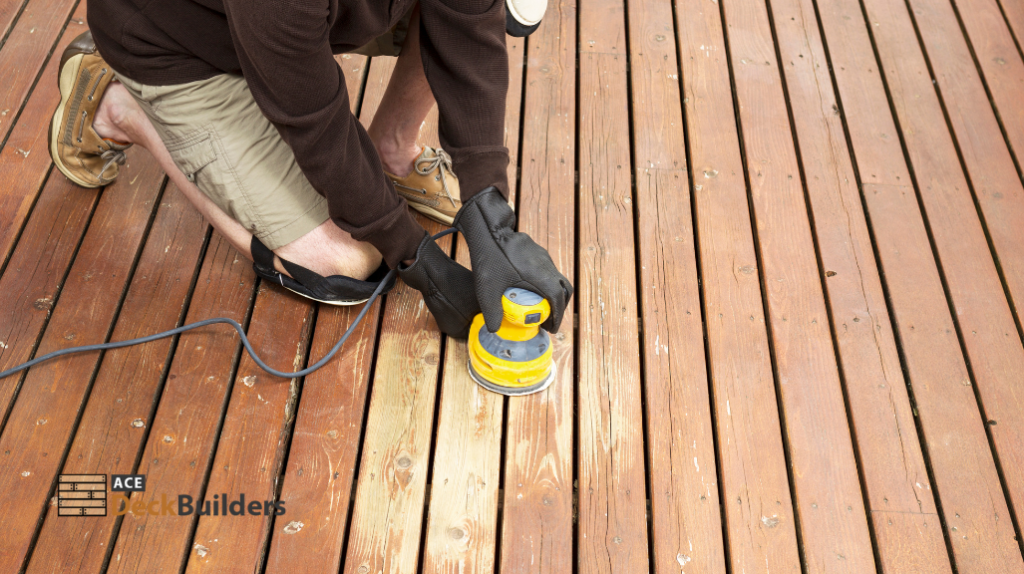
Tools & supplies: driver + bits, socket set, random-orbit sander (60–100 grit), end-grain sealer, butyl joist tape (for top-side touchups), exterior-rated screws, structural screws (ledger/rail posts), oxygenated cleaner, brightener, garden sprayer, soft-bristle brush, hose, gloves/eye protection.
Safety first: Wear PPE, keep kids/pets clear, and treat any ladder or elevated work like roof work. If a ledger looks suspect or posts feel spongy, pause here and get professional eyes on it.
Deep-day sequence
- Clear and clean: Remove furniture/rugs; blow off debris. Wet the deck and apply oxygenated cleaner; agitate gently; rinse top and underside edges where pollen cakes.
- Brighten and neutralize: Apply brightener to reset pH and lift tannin streaks; rinse thoroughly.
- Tighten and replace:
- Drive test: snug all visible screws (don’t over-torque).
- Structural checks: ledger bolts/structural screws, beam/post hardware, and bracket nails—tight and corrosion-appropriate. Replace rusting or mismatched fasteners.
- Rail posts: Reinforce any rocking posts with rated brackets or through-bolts.
- Drive test: snug all visible screws (don’t over-torque).
- End-grain protection: Touch every cut end—stair stringers, board ends, notches—with end-grain sealer. This is where “wick-rot” starts if left raw.
- Joist-top tune-ups: If you can access exposed crowns or splice lines, add or re-roll butyl joist tape to keep water off fastener penetrations.
- Surface fixes: Re-set proud screws; swap split or cupped boards; lightly sand fuzzed areas (60–80 grit on flats, 100 on rails).
- Drainage pass: Clear leaf dams along the perimeter and under stairs; confirm downspouts miss the deck; rake any mulch that’s climbed onto fascia.
- Lighting and electrical: Replace cracked lenses; gently snug wire connectors; verify low-voltage transformers are dry and protected.
- Finish decision: If water no longer beads in high-traffic sun zones, plan a maintenance coat (see “Finishes…” below).
When in doubt on structure or permitting, a formal inspection pays for itself. Book a site check with a pro—more on that below.
Monthly and seasonal habits that pay off
You can reduce your annual workload by sprinkling in tiny tasks during the months you use the deck most.
March–June (ramp-up season)
- Rinse pollen every couple of weeks to keep a slick film from forming.
- Check stair traction and add anti-slip treads if needed.
- After a wind event, re-check guard posts and furniture tie-downs.
July–August (peak heat)
- Shade the boards you’ll stand on the most (grill station, lounge path). Heat doesn’t just age finishes; it drives movement in fasteners.
- Wipe sunscreen spills quickly; many films stain if left to bake.
September–October (storm bursts + leaves)
- Clear drains, perimeter gaps, and any under-deck channels after significant rain.
- Make sure skirting breathes—pop vents or switch sections to open lattice.
November–February (quiet season)
- Schedule the deep day.
- Plan any rail upgrades or structural reinforcements while demand is lower.
Drainage and airflow tactics that stop rot before it starts
Moisture problems rarely begin at the top of the boards; they begin where water collects afterward.
- Keep gaps accurate: Use a feeler gauge once a year, open tight joints with a spacer, and lightly re-screw where safe.
- Drip edges matter: Add a subtle drip kerf under nose pieces and stair treads so water doesn’t wick back into the end grain.
- Air under the skirt: Either leave a continuous 1–2-inch shadow gap at the bottom of skirting or add hidden vents every few feet.
- Gravel borders: Replace mulch directly against fascia with a 6–12-inch strip of clean gravel to stop splash-back.
- Downspouts and AC condensate: Route both away from joists, ledger, and stair landings.
- Under-deck storage: If you store bins, keep them off the ground on grates to maintain airflow.
If you’d rather have a third party do a targeted moisture/safety review and hand you a prioritized list, consider booking a deck inspection before the rainy season.
Finishes that actually survive here (and when to refresh)
Finish failure looks dramatic, but it’s usually predictable—and preventable. In Austin sun:
- Semi-transparent stains (light to mid tones) are the best compromise for UV defense and grain visibility. Expect 18–36 months in full sun with proper prep.
- Solid finishes block UV hard but behave like thin paint; they’ll peel on damp or poorly prepped wood. Use when you need uniform color on older boards and accept more involved prep next time.
- Clear oils are beautiful on shaded or hardwood sections, but need frequent refreshes in the west sun.
Refresh timing: If water beads only in patches—or not at all—don’t wait for peeling. Do a maintenance coat while the surface is still sound: clean → brighten → dry to under 15% moisture → light sand (open pores) → touch end-grain → apply per label. If that sounds like a lot, it is—outsourcing just the prep often makes the finish last longer and look better. We can handle the full cycle of professional deck staining in Austin and provide exact recoat timing based on your exposure.
Pro tip: Lighter, low-glare colors run cooler on bare feet and hide dust. Pair them with shade over seating for comfort that reads as “cooler” even if the thermometer disagrees.
Fasteners, flashings, and rails: keep the skeleton solid
No stain can rescue a loose structure. Add these checks to your tune-up:
- Ledger connection: Look for continuous metal flashing with a drip edge and a neat shingle-lap under siding or WRB. Structural screws or through-bolts should have consistent spacing and edge distances; nothing should be “toenailed into brick veneer.”
- Joist hangers and brackets: Confirm proper fasteners (not drywall screws). If you find electro-galvanized or rusty nails, replace them with hot-dip galvanized or stainless fasteners appropriate for your lumber.
- Rail posts: Through-bolted with tested brackets; base gaskets and butyl underplates prevent water traps.
- Stainless where it counts: Near pools or splash zones, 316 stainless hardware avoids corrosion streaks and stuck fasteners later.
- End-grain again: Touch every new cut—repairs, notches, stair ends—with sealer. Wick-rot starts where capillaries are open.
Stairs, lighting, and electrical: small checks, significant safety
Stairs and low-voltage systems live where feet, water, and movement meet—give them attention:
- Stair runs: Even rises (avoid “trip risers”), solid stringer bearing on pads or standoffs, closed risers where small kids roam, high-traction treads.
- Handholds: Graspable rails with tight brackets; no wiggly posts.
- Night lighting: Replace cracked lenses; clear nests and webs; keep light levels low-glare to preserve night vision (and neighborly skies).
- Wiring health: Low-voltage connections should be dry and strain-relieved; GFCI protection for outlets; no cords running across walking paths.
Timelines, budgets, and when to call in a pro
Time investment:
- Annual deep day: 1 day for most decks (bigger or multi-level decks may take a weekend).
- Monthly habits (Mar–Oct): 15–30 minutes twice a month.
Typical costs:
- DIY consumables (cleaner, brightener, end-grain sealer, fasteners, tape): modest, often under $300 depending on size.
- Maintenance coat materials vary by product and square footage; labor is the bigger variable.
- Professional help: inspections, staining prep, rail/ledger remediation—priced after site review, often far less than a late-stage replacement.
Call a pro now if:
- The ledger shows staining or softness.
- Guard posts wiggle or the top rail flexes;
- Post bases or stringer feet feel spongy.
- Multiple joist or beam ends are dark and soft;
- A previous solid film is peeling across broad areas (you need strip + reset).
FAQs
Get a Deck Tune-Up Plan Tailored to Your Space

Give your deck the care it truly needs with a maintenance plan designed around your slope, shade patterns, materials, and how you actually use the space. Our team walks your deck in person, checks structural points, evaluates wear, and identifies issues that matter most for safety, longevity, and comfort. From moisture-prone areas to sun-faded boards, loose fasteners, and shifting footings, we map out a clear, prioritized list—so you know exactly what to tackle this year and what can wait. If you prefer, we can handle all the heavy lifting, from minor repairs to full refinishing and upgrades. It’s a more innovative, more efficient way to keep your deck looking great and performing even better. Call (512) 566-7519 or start here by requesting your Austin deck estimate to get your custom plan and pricing.