
TL;DR
Great yard prep prevents schedule slips, surprise costs, and inspection rework. In Austin, focus on: (1) utilities locating, (2) clean site access and staging, (3) tree/landscape protection, (4) drainage and grade, (5) HOA/city readiness, and (6) safety for pets, kids, and neighbors. Complete these tasks before demo day, and remember to check local building codes to ensure compliance your installation will fly. For a benchmark on pro standards and outcomes, check out the portfolio and process at Ace Deck Builders.
Why Yard Prep Matters in Austin
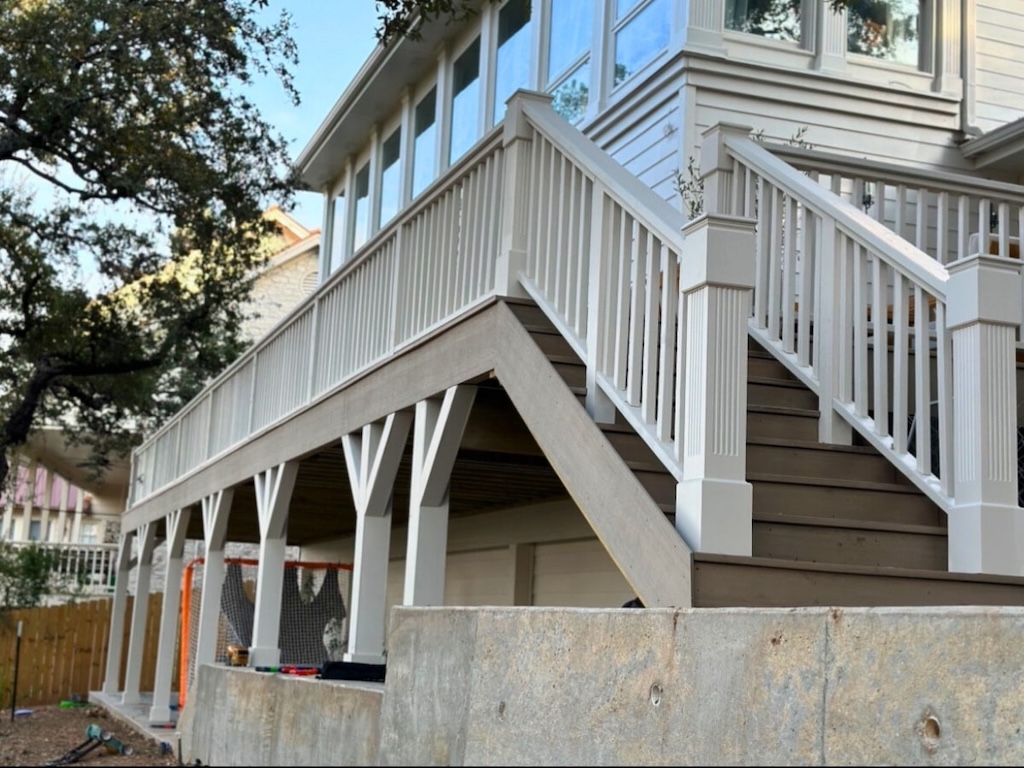
Austin decks aren’t just weekend projects—they’re structural additions that must breathe in summer heat, handle sudden storms, and pass city inspections. The most common delays we see aren’t carpentry problems; they’re yard-prep problems: locked gates when the inspector arrives, sprinkler lines where footings belong, tree roots uncovered at the last minute, or no clean staging space for composite bundles and rail kits. Good prep is crucial and makes build days predictable, protects landscaping, avoids change orders, and keeps the crew focused on quality rather than crisis management.
Week-by-Week Prep Timeline (What to Do & When)
2–3 weeks before mobilization
- Confirm utilities marking and note irrigation routes.
- Finalize access path for crews, wheelbarrows, and skid-steer (if needed).
- Decide what landscaping will be kept, moved, or protected.
- Approve drawings and any HOA/city paperwork to keep your schedule.
1 week before
- Clear furniture, grills, planters, toys, and pet gear from the work zone.
- Trim shrubs/branches that block access.
- Mark any private cable, low-voltage lighting, or speaker wiring.
- Identify a flat, shaded spot for material staging.
Day before
- Unlock gates, move vehicles, and secure pets.
- Turn off automatic irrigation in the work zone.
- Walk the site with your builder to review staging, protection, utilities, and neighbor considerations.
Step 1: Confirm Utilities, Easements & Property Lines
Footings and post bases don’t mix well with hidden lines—neither do inspectors. In Central Texas neighborhoods, we routinely encounter:
- Irrigation mains and lateral lines near the patio/yard edge.
- Low-voltage lighting wires just beneath the mulch.
- Buried cable/internet lines at shallow depths.
- Downspout drains or French drains that cross future footing locations.
What to do
- Request utility locates and have your irrigation contractor flag central and lateral runs.
- Mark private lines (lighting/speakers) with tape or landscape flags.
- Share utility photos/drawings with your builder so footings can shift a few inches on paper—cheaper than moving them in dirt.
- Verify easements and property lines to ensure piers, stairs, or privacy screens don’t encroach on restricted zones.
Pro tip: Snap photos of all flagged lines before demo; this way, if flags get knocked down, you’ll still have a record.
Step 2: Plan Site Access, Staging & Protection
Crews transport people, tools, and heavy materials daily. A smart access plan preserves your yard and your schedule.
Access path
- Choose a route wide enough for materials and carts (36–42″ if possible).
- Remove or temporarily reposition gates/obstructions if they choke the path.
- Protect sensitive surfaces (pavers, turf) with plywood sheets or ground protection mats.
Staging zone
- Identify a flat, closed area for lumber, composite bundles, rail kits, and fastener bins.
- Prefer shaded/covered spots for finish items (lighting, hardware) and adhesives.
- Keep staging inside your fence to curb “walk-by” curiosity.
Protection plan
- Cover AC units and windows near saw/fastener work.
- Wrap nearby columns/siding with foam/plywood.
- Create a sawdust zone downwind of doors and air intakes.
Step 3: Trees, Roots & Landscaping (Protect What You Love)
Austin yards often feature live oaks, cedar elms, and heritage trees that define the space. Decks can coexist with them—if you plan.
Tree health & root zones
- Avoid digging footings in major root zones; adjust pier spacing or beam direction where feasible.
- Use an air-spade or hand-dig around critical roots if a footing must be near a trunk.
- Plan root-friendly irrigation adjustments after the deck is complete.
Landscape preservation
- Transplant shrubs out of the footprint before demo day.
- Cover beds with breathable fabric and plywood to deflect foot traffic and debris.
- Tag plants you care about; crews can’t read minds.
Shade & leaf drop
- If your deck will live beneath a canopy, discuss skirting ventilation, gutter/downspout routes, and surface textures that won’t become slippery with leaf litter.
Step 4: Drainage, Grade & Soil Conditions
Great decks respect water. Before installing the first footing and establishing a solid foundation , confirm how water moves through your yard.
Grade & flow
- Ensure the deck frame doesn’t trap runoff against the house.
- Keep a 1–2% slope away from structures where feasible; include drip gaps at complex transitions.
Downspouts & drains
- Extend or reroute downspouts so they don’t discharge beneath the new deck.
- Protect/relocate French drains or dry wells that intersect the footprint.
Soil realities
- Expect caliche or rock pockets in parts of Austin; as a result, footing diameters or depths may need to be adjusted.
- If soils are soft or saturated after rain, allow an extra day for footing work; it’s cheaper than rework.
Ventilation
- For low-clearance decks, bake in cross-ventilation under the frame to discourage moisture buildup and heat concentration.
Step 5: HOA/Covenants, Permits & Inspection Readiness
Even the best yard prep won’t save a project that isn’t paperwork-ready, especially when coordinating with local utility companies .
HOA
- Submit complete packets: plan, elevations, materials/colors, and any lighting/shade details.
- Batch your answers to avoid piecemeal delays.
Permits
- Your contractor should own the application, drawings, and inspection schedule.
- Ask for tentative inspection dates as part of the project plan.
Inspection prep
- Keep connections exposed when inspectors arrive (ledger, post bases, joist hangers).
- Clean footing holes so inspectors can see depth/soil conditions on the first visit.
Want a deeper view of the sequence from drawings to final inspection—and what a pro does vs. what you do? Mid-research, it helps to skim a specialist’s overview of deck installation in Austin so you can benchmark expectations and responsibilities.
If the new deck will border a pool or replace aging surrounds, review considerations unique to pool deck installation—clearances, slip-aware surface choices, and equipment access can change your prep list.
For homeowner-level prep beyond this guide, this quick explainer—how to prepare for a successful deck installation—offers an easy checklist you can share with family before demo day.
Step 6: Demo Day & Debris Strategy
Demolition is messy by nature; a plan keeps it controlled.
Before demo
- Remove grills, furniture, planters, toys, and décor.
- Turn off irrigation in the zone.
- Cover grills and furniture stored nearby; sawdust travels.
During demo
- Expect noise and vibration; let neighbors know a day ahead.
- Keep pets and kids inside—popped nails and splinters are unavoidable.
- Ask crews to separate metal (railing, fasteners) from wood for recycling.
After demo
- Walk the footprint with your builder to spot hidden conditions (rot at the ledger, unexpected utilities, rock).
- Confirm any change-order items before proceeding to footings.
Step 7: Material Delivery, Storage & Weather Planning
How you store materials is as important as what you choose.
Lumber & composites
- Store flat, supported every 16–24″ to prevent warping.
- Keep composite bundles wrapped until install; unwrap only what the crew will use that day.
- Shade is your friend; direct sun can overheat dark products and complicate handling.
Rail & lighting kits
- Stage in a dry, protected area with labels facing out for fast inventory checks.
- Keep small parts (clips, screws, connectors) in clear bins so they don’t get lost or scattered.
Weather sequencing
- If a storm window opens, crews may swap tasks (e.g., rough wiring while soils dry for footings). Flexibility keeps the timeline intact without quality compromises.
Step 8: Safety Plan for Pets, Kids & Neighbors
Construction is a magnet for curiosity—set rules early.
- Create temporary pet relief zones away from work.
- Establish “no-go” hours for backyard play while saws and nailers are active.
- Communicate work hours and access needs with neighbors who share fences or alleys.
- Post a simple jobsite safety note inside the back door as a reminder for everyone.
Owner Checklist (Print-Friendly)
Use this to prep your yard and keep your timeline tight.
Utilities & Boundaries
- Utilities marked; irrigation mains/laterals flagged.
- Low-voltage wires (lighting/speakers) identified.
- Easements/property lines verified with the builder.
Access & Protection
- 36–42″ access path cleared
- Staging zone selected (flat, shaded, close)
- Windows/AC/siding protected; dust path downwind
Trees & Landscaping
- Transplants completed; beds covered
- Root-sensitive areas identified; hand-dig plan if needed
- Shade/leaf-drop plan (ventilation, surface texture)
Drainage & Grade
- Downspouts routed away from the footprint
- French drains protected/relocated if necessary
- Low-deck ventilation planned
HOA/Permits/Inspections
- HOA packet approved (plan, elevations, colors)
- Permit submitted/approved; inspection hold points scheduled
- Plan to keep connections exposed for inspectors
Demo & Debris
- Furniture/grills moved; irrigation off in work zone
- Recycling plan for metal debris haul-off arranged
- Walk footprint post-demo for surprises
Materials & Weather
- Delivery dates confirmed; storage method set
- Rail/lighting kits protected; small parts in bins
- Weather resequencing discussed with PM
Safety & Courtesy
- Pet plan; kid safety rules posted
- Neighbor notice sent (start date/hours)
- Gate/lock logistics set for crew/inspector access
FAQs
Get Your Austin Deck Started Right
Want a schedule that sticks and a yard that looks great when the dust settles? We’ll map utilities, staging, drainage, inspections, and a week-by-week plan—then price it line by line. Start with a free deck estimate in Austin, and we’ll guide your project from layout lines to the first cookout, ensuring no surprises.